EXPOSURE
What Is Exposure in Cameras? In photography, exposure is the amount of light which reaches your camera sensor or film. It is a crucial part of how bright or dark your pictures appear. There are only two camera settings that affect the actual “luminous exposure” of an image: shutter speed and aperture. The third setting, camera ISO, also affects the brightness of your photos, and it is equally important to understand. Also, you can brighten or darken a photo by editing it in post-processing software like Photoshop on your computer. It sounds basic, but exposure is a topic which confuses even advanced photographers. The reason is simple: For every scene, a wide range of shutter speed, aperture, and ISO settings will result in a photo of the proper brightness. You haven’t “mastered exposure” once you can take a photo that’s the right brightness. Even your camera’s Auto mode will do that most of the time. Instead, getting the proper exposure for a photo is about balancing those three settings so the rest of the photo looks good, from depth of field to sharpness. If you really want to master exposure, reading about it isn’t enough. You also need to go out into the field and practice what you’ve learned. There’s no quick-and-dirty way to pick up a skill like this. But if you can lay a solid groundwork, you’ll be at a huge advantage when you go out and practice it for yourself. The goal of this comprehensive article is to teach you all the basics that you need to know about exposure.
What Is Exposure in Cameras? In photography, exposure is the amount of light which reaches your camera sensor or film. It is a crucial part of how bright or dark your pictures appear. There are only two camera settings that affect the actual “luminous exposure” of an image: shutter speed and aperture. The third setting, camera ISO, also affects the brightness of your photos, and it is equally important to understand. Also, you can brighten or darken a photo by editing it in post-processing software like Photoshop on your computer. It sounds basic, but exposure is a topic which confuses even advanced photographers. The reason is simple: For every scene, a wide range of shutter speed, aperture, and ISO settings will result in a photo of the proper brightness. You haven’t “mastered exposure” once you can take a photo that’s the right brightness. Even your camera’s Auto mode will do that most of the time. Instead, getting the proper exposure for a photo is about balancing those three settings so the rest of the photo looks good, from depth of field to sharpness. If you really want to master exposure, reading about it isn’t enough. You also need to go out into the field and practice what you’ve learned. There’s no quick-and-dirty way to pick up a skill like this. But if you can lay a solid groundwork, you’ll be at a huge advantage when you go out and practice it for yourself. The goal of this comprehensive article is to teach you all the basics that you need to know about exposure.

SHUTTER SPEED
We’ll start with a good one. Shutter speed isn’t particularly difficult; it is just the amount of time your camera spends taking a picture. This could be 1/100 of a second, or 1/10 of a second, or three seconds, or five minutes. Some people build custom cameras that take decades to capture a single photo.
Your camera won’t let you take a decades-long photo. Instead, the longest allowable shutter speed tends to be around 30 seconds, although it does depend upon your camera. For example, on the Nikon D850, you can shoot any shutter speed from 1/8000 second to 30 seconds, as well as a time mode for even longer exposures. Other cameras generally allow similar settings.
So, why does shutter speed really matter? There are two main reasons:
First, as you would expect, a long shutter speed (several seconds) lets in a large amount of light. If you take a normal daytime photo with a 30-second shutter speed, you will capture an image that is completely white. The opposite is true, too; a quick shutter speed only lets in a small amount of light. If you take a photo at night with a 1/8000-second shutter speed, the photo will be completely black.
Take a look at the series of examples below. Here, 1/25 second was too dark (“underexposed”), and 1/3 second was too bright (“overexposed”). This should give you an idea of the brightness differences with shutter speed:

Second, the only other big effect is the motion blur in your images. Not surprisingly, a long shutter speed (such as five seconds) captures anything that moves during the exposure. If a person walks by, they might appear as a featureless streak across the image, since they aren’t in one place long enough for the long exposure to capture them sharply. That’s called motion blur.
By comparison, a quick shutter speed (such as 1/1000 second) does a much better job freezing motion in your photo — even something moving quickly. You can photograph a waterfall at 1/1000 second and see individual droplets frozen in midair. Without a camera, they might have been invisible.
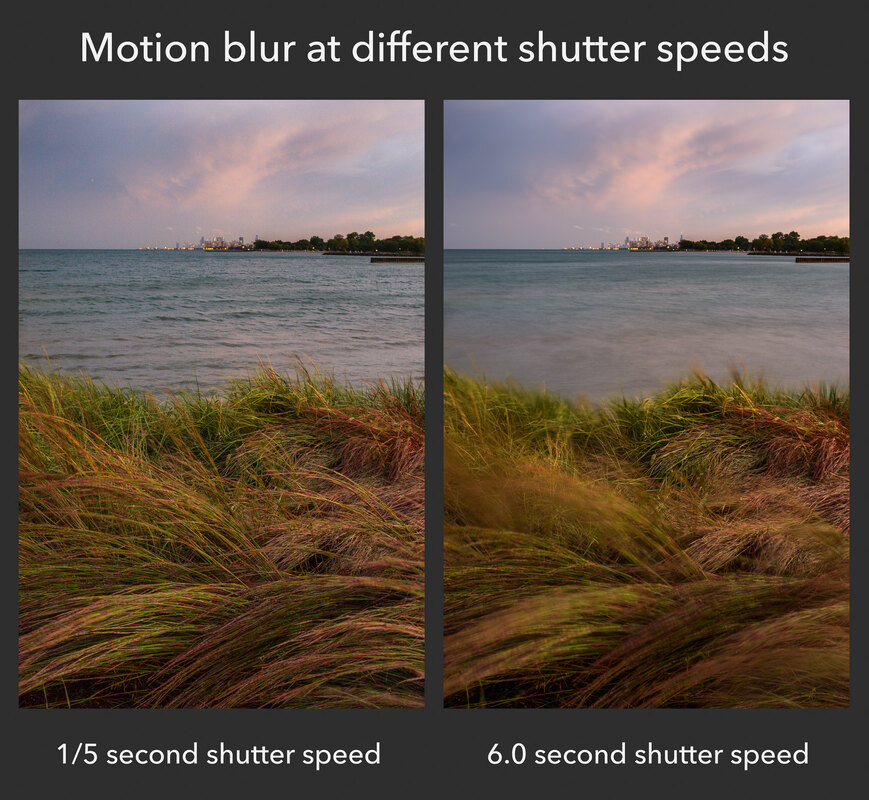
Take a look at the images below. Here, I was taking pictures on a windy day. The foreground grass and the waves behind them were all moving quickly. As you can see, depending upon my shutter speed, there was a major difference in motion blur:
By comparison, a quick shutter speed (such as 1/1000 second) does a much better job freezing motion in your photo — even something moving quickly. You can photograph a waterfall at 1/1000 second and see individual droplets frozen in midair. Without a camera, they might have been invisible.
Take a look at the images below. Here, I was taking pictures on a windy day. The foreground grass and the waves behind them were all moving quickly. As you can see, depending upon my shutter speed, there was a major difference in motion blur:
However, in many cases, you probably will want to eliminate motion blur so that your entire photo is sharp. If that’s your goal, you need to pick a shutter speed that is quick enough to freeze any movement. So, what shutter speed should you use? Is there a good range that tends to provide sharp photos of moving subject? Not really, because it all depends upon some outside factors – most importantly, the amount of movement in your scene. If your subject is moving very quickly, you’ll need a fast shutter speed. If your subject is standing still, or only moving very slowly, you can get away with a longer shutter speed. Also, the farther you zoom in (i.e., the longer your “focal length”), the more you’ll magnify motion blur. So, you’ll find that you generally need quicker shutter speeds to freeze motion properly when you’re using something like a telephoto lens. The best route to learn all of this is just to keep practicing. Over time, you’ll build a good mental picture of the shutter speeds you can use in a particular environment without risking motion blur. Whether that’s 1/250 second, 1/10 second, or 20 seconds, it’ll be second nature. Also, after you’ve taken a picture in the field, review it and see if there is any blur when you zoom in. If so, you’ll need a quicker shutter speed. Want a quick-and-dirty guideline? Use 1/500 second or faster for sports and wildlife action. Use 1/100 second or faster for telephoto portrait images. Use 1/50 second or faster for wider-angle portrait or travel photos where your subject isn’t moving too much. If your subject is completely still, and you have a tripod, use any shutter speed you want. These are very general suggestions, but they are a good place to start. However, your goal should be to outgrow these tips and develop your own mental model instead. Shutter speed is one of the most intuitive aspects of exposure, and a bit of practice will be enough to help your photographs improve significantly.
APERTURE
Aperture is very similar to the “pupil” of your camera lens. Just like the pupil in your eye, it can open or shrink to change the amount of light that passes through. This is how the aperture blades look on a typical lens:
APERTURE
Aperture is very similar to the “pupil” of your camera lens. Just like the pupil in your eye, it can open or shrink to change the amount of light that passes through. This is how the aperture blades look on a typical lens:
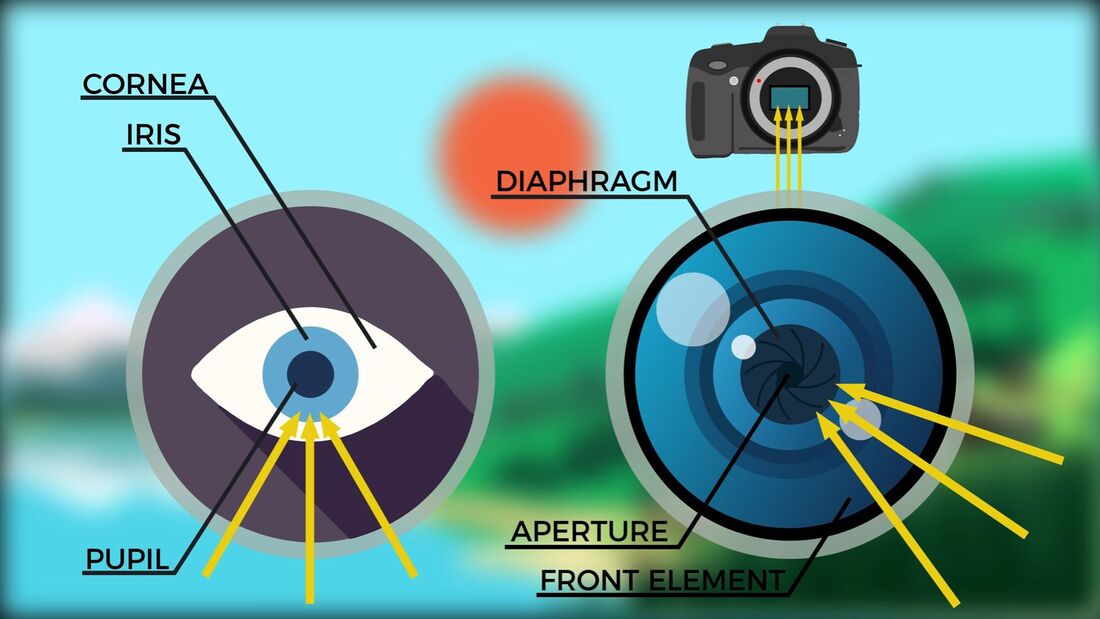
Your lens probably looks something like this. The shape in the middle is called the aperture. It is made up of several blades – nine of them in this case, but your lens may differ. Aperture blades work a lot like the pupil in your eyes. At night, your pupils dilate so you can see things more easily. The same is true for aperture. When it is dark, you can open the aperture blades in your lens and let in more light. Aperture is written as f/Number. For example, you can have an aperture of f/2, or f/8, or f/16, and so on. It is very important to remember that aperture is a fraction. This is the biggest mistake beginners make when they talk about aperture. If you get this wrong, it will be difficult to remember how aperture works or use it yourself to capture the right exposure in the field.
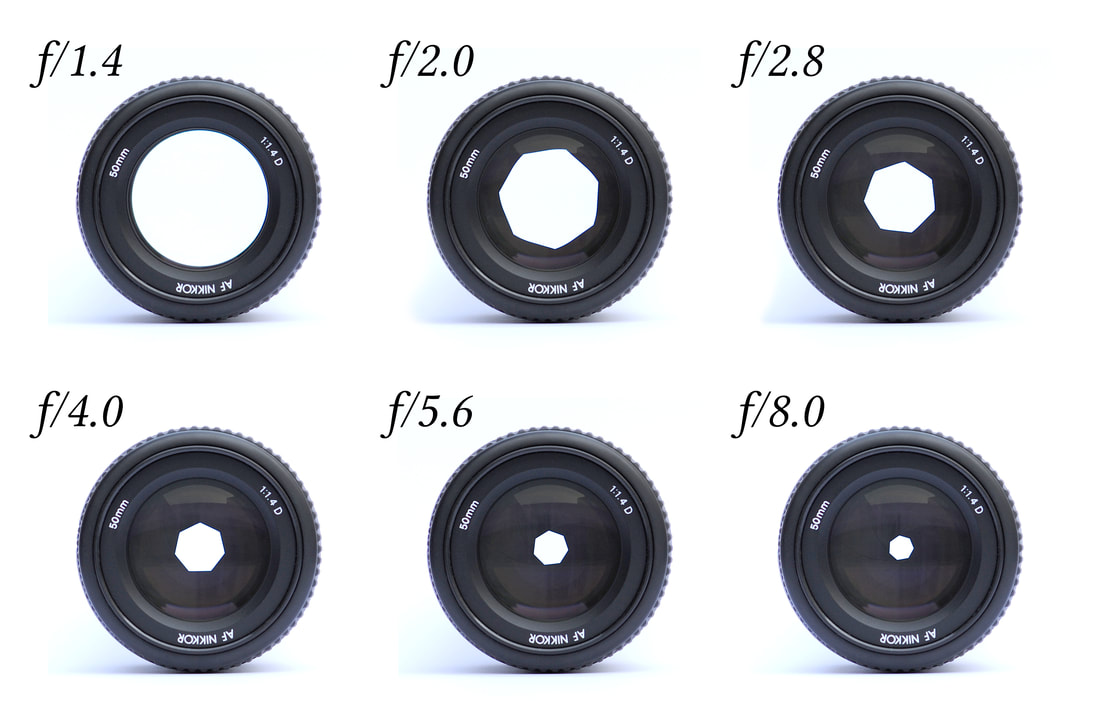
Typically, the largest aperture you can set will be something like f/1.4, f/1.8, f/2, f/2.8, f/3.5, f/4, or f/5.6. It changes from lens to lens. The smallest aperture on most lenses is something like f/16, f/22, or f/32. This diagram demonstrates the relative sizes of various aperture settings:
RULE OF THIRDS
So I’ve just told you that there are no hard and fast rules when it comes to composition and then the first thing I write about is the ‘rule’ of thirds. In my defence, I didn’t come up with the name. The rule of thirds is very simple. You divide the frame into 9 equal rectangles, 3 across and 3 down as illustrated below. Many camera manufacturers have actually included the capability to display this grid in live view mode. Check your camera’s manual to see how to turn on this feature.
The idea is to place the important element(s) of the scene along one or more of the lines or where the lines intersect. We have a natural tendency to want to place the main subject in the middle. Placing it off centre using the rule of thirds will more often than not lead to a more attractive composition.
DEPTH OF FIELD
Depth of field is the amount of your scene, from front to back, that appears sharp. In a landscape photo, your depth of field might be huge, stretching from the foreground to the horizon. In a portrait photo, your depth of field might be so thin that only your subject’s eyes are sharp.
Aperture changes your depth of field, which makes a big difference if you want to capture the best possible photographs. Changing the depth of field in an image will alter the way it looks completely.
To be specific, small apertures (like f/11 or f/16) give you a large depth of field. If you want everything from front to back to appear sharp, those are good settings to use. Large apertures (like f/1.4 or f/2.8) capture a much thinner depth of field, with a shallow focus effect. They are ideal if you are trying to isolate just a small part of your subject, making everything else blurred.
Here is a sample comparison:
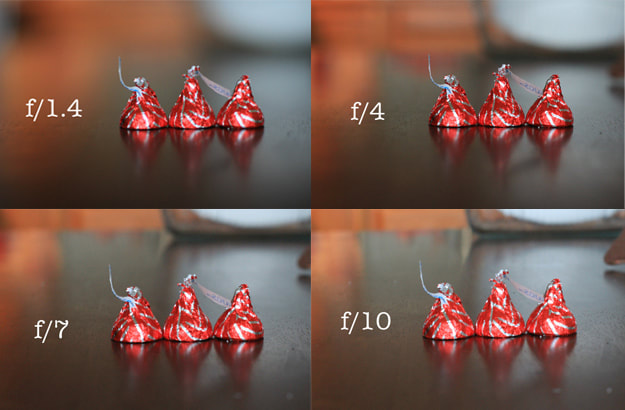
As you can see, that is a significant difference. The photograph on the left has a larger depth of field, which means that more of the scene appears sharp from front to back. However, the f/2.8 photo on the right has a pleasant shallow focus effect. In this case, it is arguably the better image. You will save yourself a lot of difficulties if you simply memorize this relationship. In practice, the effects are quite clear. As your aperture gets smaller and smaller, your exposure will grow darker and darker, and your depth of field will increase. (Remember, too, that you can expose the photo back to normal by using a longer shutter speed.) The more photos you take, the less you will have to think about these effects. They will become second nature.
COMPOSITION
composition is how the elements of a photo are arranged. A composition can me made up of many different elements, or only a few. It's how the artist puts those things within a frame that help a photograph become more or less interesting to the viewer.
A good photograph will take many different parts and combine them into an aesthetically pleasing whole. Composition is how an artist tells a story within the confines of a single frame.
Why is Composition Important in Photography?
How many times have you seen a photograph that seemed to be taken in an amazing location with an incredible subject, but the image didn't do much for you? The problem very well might be that the composition was off.
Composition is everything when it comes to a photograph. Oftentimes, the technical side of an image is pretty easy to learn, so the one thing that separates a great image from one that is less interesting is the composition.
Everyone has a camera these days, so how you are able to visually capture something that is also being photographed by the masses right alongside you will help to distinguish your work from other photographers. Hopefully, this will gain you the success or business you seek.
BALANCE
I always refer to balance as a 'teeter-totter'. If you split your composition in to halves (top and bottom or left and right), does it feel like they belong together? Does one side feel like it has too much going on? This doesn’t mean that both sides have to be symmetrical… but if you have an object on one side that attracts the viewer's eye, the other side should have something to keep you interested in the whole image as opposed to just the dominant or larger object.
